So, throughout all that mental banter, I also told myself, "Take note of these thoughts. This is part of the process. Give the thoughts their due." And so I did allow the banter. I honoured the process. I thought you might like to hear it and then see some of the results (click to enlarge):


 There were sixteen terrific women in the wetfelting workshop! Thanks to the soap and the participants' lively chatter and laughter, the room smelled and sounded heavenly. Their enthusiasm and desire really carried us through what was a rather ambitious project for an hour-and-a-half session; many of them had not wetfelted before! I always worry about being a person's first lesson, I feel it is a big responsibility. All of their efforts turned out beautifully! Just imagine all the stories that will play out with these wonderful pieces as scenery...!
The doll-making workshop was equally successful, but we were a bit rushed at the end, and I had left my camera in the room where the felting workshop was, so sorry, no pictures. Enthusiasm was high though; a few knitters learned to purl; everyone finished their dolls; one knitter made two dolls (!); there was even a very friendly competition going on between two friends! Just hearing them say that their young ones at home would love this doll made me smile (actually, I'm still smiling). The two samples that I made have already made their way into Hana's play here at home, so I'll try to take some pictures to post over the weekend.
So, thank you for indulging me and my process. It's nice to have a place like this to lay such things out and take a good long look. Thank you for reading here and lending me your ear, it means the world to me. This song kind of sums up how I feel about my blog and the friends I have here; this one's for you!

 You will need some wool felt and embroidery floss in any colors that please you or your Valentine(s), scissors, a hand-sewing needle, and a heart-shaped pattern.
 The pattern I use is 2" wide and just shy of 2" tall. I cut it in the good ol' fold-a-piece-of-paper-in-half-and-cut-half-a-heart-shape way. Once I came up with a heart that was just right, I transferred it onto a piece of cardstock (aka magazine subsciption insert), cut it out, and use it repeatedly.
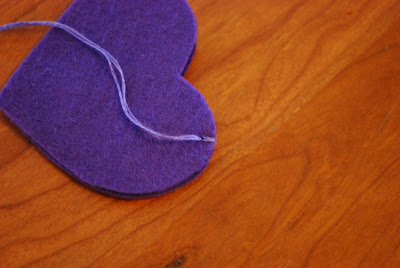
 Using a ball-point pen, trace around the pattern onto the felt twice. Cut out the two felt hearts.
 Now you can stitch a design on one of the felt hearts, or both if your heart desires. ;) I've done monograms in back-stitch or split-stitch, French-knot sprinkles, sashiko type stitches, chain-stitch flowers.... It is really up to you!
 Here's how I make a French knot. Send the threaded needle through the felt where you want a little 3-D dot. Lay the needle flat against the felt and wrap the floss around the needle. In this case, I went around three times, but two or four could also work.
 Then carefully point the needle back into the felt very close to where the needle came out in the first place. Tug the floss to snug the wraps around the needle close to the felt. Draw your thread through, keeping an eye on the wraps, maybe use your thumbnail to keep them from going astray. Ta-da!!! A sweet little French knot! Sprinkle them around as you like.
 So send the needle backwards under the floss of the first stitch.
 Then come to the front and stitch from front to back.
 Before you pull the stitch snug, send the needle through the loop the forms. Pull until the loop lays down over the gap between the front and back. Continue in this manner around the heart until you get to the top of the other "hump".
 At this point, blanket-stitch only the edge of the front piece.
 When you get to the other "hump", send the needle under the very first stich to create the horizontal "laying down" part of the stitch. Now continue with the blanket-stitching on the back piece.
 When you come to the other "hump" again, send the needle under the last stitch that joined the front and back.
 To secure the end, send the needle under that same stitch once more, but before pulling it snug, put the needle through the loop twice, then tug slowly. A knot will form; again, you may need to guide the knot with your fingernail to keep it from travelling up your thread away from the stitch. Now, slide the needle through a nearby edge of the felt, keeping the needle within the thickness of the felt (not sandwiched between the two pieces), poke the needle out again, and snip the floss close to the felt. This will bury the floss within the felt.

 So, about the felt hearts... I found this
 On the daily menu at Hana's Cafe: for breakfast, a shortstack of pancakes with maple syrup and a pat of butter. Yum. {knitted and felted from
  Then for lunch, a
 Dessert! Yea! An oreo-type cookie. Extra-Yum! {