So today I am going to take you step-by-step through making a felt heart pouch. Brace yourself, there are many photos and directions. I hope you like it!
 You will need some wool felt and embroidery floss in any colors that please you or your Valentine(s), scissors, a hand-sewing needle, and a heart-shaped pattern.
 The pattern I use is 2" wide and just shy of 2" tall. I cut it in the good ol' fold-a-piece-of-paper-in-half-and-cut-half-a-heart-shape way. Once I came up with a heart that was just right, I transferred it onto a piece of cardstock (aka magazine subsciption insert), cut it out, and use it repeatedly.
 Using a ball-point pen, trace around the pattern onto the felt twice. Cut out the two felt hearts.
 I'm going to show you how my mother taught me to thread a needle a looooong time ago. (If you click on that crazy collage, it will get bigger and be easier to see). Separate out three strands of embroidery floss. Fold the floss over the needle and pinch the floss and needle so you can barely see the folded floss. Slide out the needle. Now slip the eye of the needle over the barely visible fold of floss, and the fold should slide through the eye! Maybe you knew how to do that. That's a bit of Mom Magic that I have never forgotten. A while back, I came across Heather Bailey's brilliant knot technique (scroll down through her sidebar for a tutorial). I had a way I made knots forever before, but now I can't remember it because Heather's way is so great!
 Now you can stitch a design on one of the felt hearts, or both if your heart desires. ;) I've done monograms in back-stitch or split-stitch, French-knot sprinkles, sashiko type stitches, chain-stitch flowers.... It is really up to you!
 Here's how I make a French knot. Send the threaded needle through the felt where you want a little 3-D dot. Lay the needle flat against the felt and wrap the floss around the needle. In this case, I went around three times, but two or four could also work.
 Then carefully point the needle back into the felt very close to where the needle came out in the first place. Tug the floss to snug the wraps around the needle close to the felt. Draw your thread through, keeping an eye on the wraps, maybe use your thumbnail to keep them from going astray. Ta-da!!! A sweet little French knot! Sprinkle them around as you like.
Once you've got the embellishments in a way that makes your heart sing (!), it's time to sew the front and back together. I use blanket-stitch because I like the way it looks and how it finishes the opening.
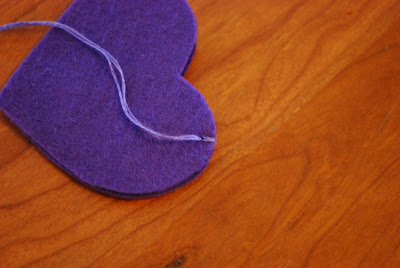
Let me qualify this back-stitch lesson with "this is how I rigged up starting a back-stitch" because there is probably a slicker way that doesn't leave a double thickness of floss on the first stitch. If you know another way, do tell!
Start stitching at the top of the left "hump" (as you look at it). To hide the knot, start on the inside and draw the needle through the back piece, around to the front, and through both.
 So send the needle backwards under the floss of the first stitch.
 Then come to the front and stitch from front to back.
 Before you pull the stitch snug, send the needle through the loop the forms. Pull until the loop lays down over the gap between the front and back. Continue in this manner around the heart until you get to the top of the other "hump".
 At this point, blanket-stitch only the edge of the front piece.
 When you get to the other "hump", send the needle under the very first stich to create the horizontal "laying down" part of the stitch. Now continue with the blanket-stitching on the back piece.
 When you come to the other "hump" again, send the needle under the last stitch that joined the front and back.
 To secure the end, send the needle under that same stitch once more, but before pulling it snug, put the needle through the loop twice, then tug slowly. A knot will form; again, you may need to guide the knot with your fingernail to keep it from travelling up your thread away from the stitch. Now, slide the needle through a nearby edge of the felt, keeping the needle within the thickness of the felt (not sandwiched between the two pieces), poke the needle out again, and snip the floss close to the felt. This will bury the floss within the felt.
 Finally, tuck a token of your affection inside, and you are done! I find these wee dark chocolates at our local food co-op. I vaguely recall finding some milk chocolate pieces too. An old key would be sweet. Or those pewter tokens. A little love note...
If you have any questions, please ask in the comments, and I'll answer there, it'll serve as a reference spot. If you make some pouches, I hope you have fun. Maybe send me a picture. I'd love that!
 There are some


 and this pile:
 and this one too:

 In the porch, early this morning, I began embroidering a motif on linen which will become the backing of the potholders/hotpads that I am contributing to the
  My little