I've snatched some time in the sewing room lately. Clearing off the work table, discovering some unfinished objects, some much adored fabric, and rekindling my desire to make some sweet duds from my Japanese sewing book pile/collection. But first, in order to provide myself some clarity and future guilt-free sewing jaunts, I finished up a few hangers on...

First up, this
Birthday Party Dress from
Oliver + S. The whole aesthetic of the Oliver + S line of sewing patterns speaks to my vintage-loving-girl-at-heart side; the illustrations (paperdolls!), the silhouettes, the hairstyles on the paperdolls, their shoes! And even though my Girly does not necessarily share my love of all things ol' fashioned, she does love blue and the prospect of a mama-made dress! If I remember correctly, the fabrics are both Lecien, but I cannot recall where I ordered from... sorry. There are many sweet details in this pattern that made it a challenge, but also make for a special mama-made; the box-pleated front, the button tab, the back button placket, and one detail that you cannot see is the faced hem (no pic, whoops). I enjoyed the whole project from start to finish, even though I started in the fall... ;)
Next up, as I was sorting through some old clothes which I hope to repurpose, I came across a shirt that was in the wrong pile (yes, there are more than one pile). This shirt belonged in the "gotta' girly this up if I ever expect Hana to wear it" pile (I'm not kidding)! This was a basic oxford, probably manufactured as a boy's style, but I think the color of the oxford cloth is special enough to warrant the effort of a re-do. So, in order to up the girly factor I visited another little, teeny-tiny pile that exists in my sewing room, the
Liberty of London Tana Lawn scrap pile. I think it was my mother who first introduced me to all that is to love about Liberty of London Tana Lawn. I know there are many
fellow worshipers, I am in good company! The scrap pile of love is the result of a bit of a splurge at
Scarlett Rose (say it with me, like
Eloise, "Oh, how I loooooove Etsy!") At Scarlett Rose, there are up for offer many, many Liberty prints in small, but usable scraps. I could pick a whole bunch and not have to decide on just a precious few! Like a kid in a candy shop! Awesome.

So, I snipped off the collar first. Then the cuffs. Better already! The sleeves had plackets, so once the cuff was gone, the opening was flappy and simply hemming it would not have tidied it up much, so enter a couple of elastic casings from some pretty teal floral Liberty, et voila! I was careful to keep the elastic on the loose side, because a lot of sleeve length was lost with the cuff removal, so the sleeves are more like a 3/4 length. Now I could have called that done, but then I felt like a bit of applique was in order. A heart of course!

While I was at it, a skirt was made also using some of the precious Liberty scrap pile, but it definitely needs to be modelled....
So, I had a good weekend clearing up some real & mental clutter. I hope you had a good one too!
xo
 Most of the time, when I choose clothes (to buy or to make) for Hana that are simple, stretchy, and colorful. However, when/if Hana chooses, she goes for buttons, belts, and bling (I can usually talk her down. ;) With this dress, we have found perfect compromise! There are many great details to this pattern, and they're all worth the extra work and time (and they're all explained beautifully in the instructions). Most important in Hana's view, the belt/sash; I think it makes her feel a bit grown up. The button tabs on the sleeves and pockets are just a sweet way to add detail and another yummy button!
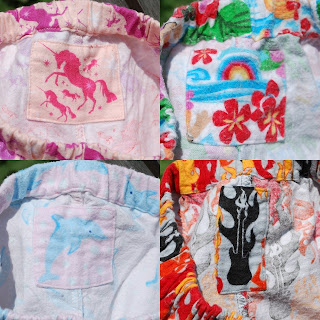
 Here are one pair of the gauchos I made from an old t-shirt of mine. I turned an existing pair inside out and traced the silhouette of one whole leg/side onto the fabric. I used the hem of the t-shirt as the hem of the pants. This particular t-shirt was very boxy, so I was able to create a very full leg style without seams on the side (I love that for kid's clothes ~ I'm not sure why). I turned over the top to make a casing for elastic. Ta-da! Pants! I had two of these shirts, this pink and a dusty orange, so now Hana has two of these pants. Woo-hoo! She really likes to layer these (I like it too); she's got leggings on too in the picture below, and if you look closely at the first picture of her dress, you can see these pants peeking out. She wore all this all day today! She cracks me up!
 Hopefully, I'll have more to add tomorrow. There was no sewing today. Lots of playing and lots of sunshine though. :)

 So, what I wanted to tell you more about was Hana's


 You will need some wool felt and embroidery floss in any colors that please you or your Valentine(s), scissors, a hand-sewing needle, and a heart-shaped pattern.
 The pattern I use is 2" wide and just shy of 2" tall. I cut it in the good ol' fold-a-piece-of-paper-in-half-and-cut-half-a-heart-shape way. Once I came up with a heart that was just right, I transferred it onto a piece of cardstock (aka magazine subsciption insert), cut it out, and use it repeatedly.
 Using a ball-point pen, trace around the pattern onto the felt twice. Cut out the two felt hearts.
 Now you can stitch a design on one of the felt hearts, or both if your heart desires. ;) I've done monograms in back-stitch or split-stitch, French-knot sprinkles, sashiko type stitches, chain-stitch flowers.... It is really up to you!
 Here's how I make a French knot. Send the threaded needle through the felt where you want a little 3-D dot. Lay the needle flat against the felt and wrap the floss around the needle. In this case, I went around three times, but two or four could also work.
 Then carefully point the needle back into the felt very close to where the needle came out in the first place. Tug the floss to snug the wraps around the needle close to the felt. Draw your thread through, keeping an eye on the wraps, maybe use your thumbnail to keep them from going astray. Ta-da!!! A sweet little French knot! Sprinkle them around as you like.
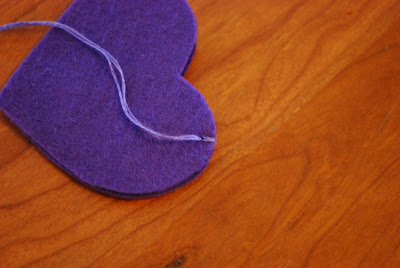
 So send the needle backwards under the floss of the first stitch.
 Then come to the front and stitch from front to back.
 Before you pull the stitch snug, send the needle through the loop the forms. Pull until the loop lays down over the gap between the front and back. Continue in this manner around the heart until you get to the top of the other "hump".
 At this point, blanket-stitch only the edge of the front piece.
 When you get to the other "hump", send the needle under the very first stich to create the horizontal "laying down" part of the stitch. Now continue with the blanket-stitching on the back piece.
 When you come to the other "hump" again, send the needle under the last stitch that joined the front and back.
 To secure the end, send the needle under that same stitch once more, but before pulling it snug, put the needle through the loop twice, then tug slowly. A knot will form; again, you may need to guide the knot with your fingernail to keep it from travelling up your thread away from the stitch. Now, slide the needle through a nearby edge of the felt, keeping the needle within the thickness of the felt (not sandwiched between the two pieces), poke the needle out again, and snip the floss close to the felt. This will bury the floss within the felt.


 There are some


 I made the medium size, without handles, and turned over the top inch or so for show. I used heavyweight linen which I purchased from
  The buckets are now housing the lotions+potions in the bathroom. I'm very happy with these! The pattern is very clear, it was smooth sailing all the way. I'm sure I'll make more since there seems to be so much stuff around here that needs to be contained! It might as well be a pretty container, right?!



 That's the best picture I have at the moment, but you get the idea, right? We used the
  And in the mainfloor bathroom the walls got a long-awaited and much-needed fresh coat of sunny apricot! Shortly after we moved into this house, in a moment of diy delusion, I painted the bathroom. It was great until the next day when it was dry, then it began to crackle! A professional painter I am not! Wrong type of paint on top of the right kind of paint... So I made "lemonade" and washed a sunny orange over the white crackle and for a while it worked. Eventually, the cracks started chipping, and so it went until now. Now it's as it should be and pretty to boot! And since I can steal away to the sewing room pretty easily when dad's around, the bathroom window got prettied up too! A simple tabbed curtain from some stash fabric and muslin. I think some fresh towels are in order, don't you?
 While at camp, friendship bracelets were the teen craft of choice (I made a few too!). For a while now, I've been ruminating on a crochet necklace w/discs or flowers or tiny granny squares, so since I hadn't put the embroidery floss away yet, I've been crocheting discs. It's addictive! I get lost in the possibilities of color combinations, sizes, and patterns! It feels great to get around to an idea that's been rattling around, you know? The pink+yellow version is Hana's pink lemonade necklace. Here's another one still in progress: